css3怎么将背景设置为渐变色
设置方法:1、使用“background:linear-gradient(渐变方向,颜色1,颜色2,..);”语句;2、使用“background:radial-gradient(shape 大小 位置,开始颜色,..,终止颜色);”语句。

本教程操作环境:windows7系统、CSS3&&HTML5版、Dell G3电脑。
渐变 Gradient
CSS3 渐变(gradients)可以让在两个或多个指定的颜色之间显示平稳的过渡。对比使用渐变图片,gradients 可以减少下载的时间和宽带的使用,并且在放大时看起来效果更好。
线形渐变
颜色值沿着一条隐式的直线逐渐过渡。由 linear-gradient() 产生。
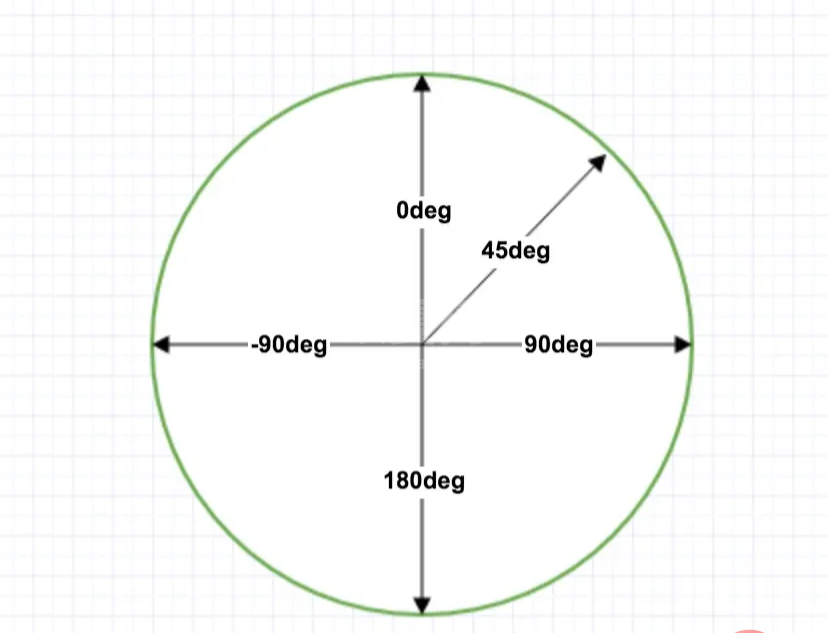
为了创建一个线性渐变,你必须至少定义两种颜色节点。颜色节点即你想要呈现平稳过渡的颜色。同时,你也可以设置一个起点和一个方向(或一个角度)。
/* 渐变轴为45度,从蓝色渐变到红色 */
linear-gradient(45deg, blue, red);

/* 从右下到左上、从蓝色渐变到红色 */
linear-gradient(to left top, blue, red);

/* 从下到上,从蓝色开始渐变、到高度40%位置是绿色渐变开始、最后以红色结束 */
linear-gradient(0deg, blue, green 40%, red);
语法
linear-gradient([ <angle> | to <side-or-corner> ,]? <color-stop-list> )

to top,to bottom,to left和to right这些值会被转换成角度0 度、180 度、270 度和90 度。其余值会被转换为一个以向顶部中央方向为起点顺时针旋转的角度。渐变线的结束点与其起点中心对称。rgba(255,0,0,0.1))。
示例:背景色线性渐变--background-image+linear-gradient()
<!DOCTYPE html>
<html>
	<head>
		<meta charset="UTF-8">
		<title>css背景渐变--线性渐变</title>
		<style>
			.demo{
				width:500 ;
				height: 300;
				margin: 50px auto;
			}
			.demo *{
				width: 200px;
				height: 200px;
				margin: 20px;
				text-align: center;
				line-height: 200px;
				color: #fff;
				font-size: 16px;
				float: left;
			}
			.demo1{
				/* 底色 */
				background-color: #fd0d0d;
				/* chrome 2+, safari 4+; multiple color stops */
				background-image:-webkit-gradient(linear, left bottom, left top, color-stop(0.32, #fd0d0d), color-stop(0.66, #d89e3c), color-stop(0.83, #97bb51));
				/* chrome 10+, safari 5.1+ */
				background-image: -webkit-linear-gradient(#fd0d0d, #d89e3c, #97bb51);
				/* firefox; multiple color stops */
				background-image: -moz-linear-gradient(top,#fd0d0d, #d89e3c, #97bb51);
				/* ie 6+ */
				filter: progid:DXImageTransform.Microsoft.gradient(startColorstr='#fd0d0d', endColorstr='#d89e3c');
				/* ie8 + */
				-ms-filter: "progid:DXImageTransform.Microsoft.gradient(startColorstr='#fd0d0d', endColorstr='#d89e3c')";
				/* ie10 */
				background-image: -ms-linear-gradient(#fd0d0d, #d89e3c, #97bb51);
				/* opera 11.1 */
				background-image: -o-linear-gradient(#fd0d0d, #d89e3c, #97bb51);
				/* 标准写法 */
				background-image: linear-gradient(#fd0d0d, #d89e3c, #97bb51);

			}
			.demo2{
				/* 底色 */
				background-color:#d41a1a;
				/* chrome 2+, safari 4+; multiple color stops */
				background-image:-webkit-gradient(linear, left bottom, right top, color-stop(0.32, #d41a1a), color-stop(0.66, #d9e60c), color-stop(0.83, #5c7c99));
				/* chrome 10+, safari 5.1+ */
				background-image:-webkit-linear-gradient(45deg, #d41a1a, #d9e60c, #5c7c99);
				/* firefox; multiple color stops */
				background-image:-moz-linear-gradient(45deg, #d41a1a, #d9e60c, #5c7c99);
				/* ie10 */
				background-image: -ms-linear-gradient(45deg, #d41a1a 0%, #d9e60c 100%);
				/* opera 11.1 */
				background-image: -o-linear-gradient(45deg, #d41a1a, #d9e60c);
				/* 标准写法 */
				background-image: linear-gradient(45deg, #d41a1a, #d9e60c);

			}
		</style>
	</head>
	<body>
		<div class="demo">
			<div class="demo1">基本线性渐变--自上而下</div>
		    <div class="demo2">基本线性渐变--45度角</div>
		</div>
	</body>
</html>
径向渐变
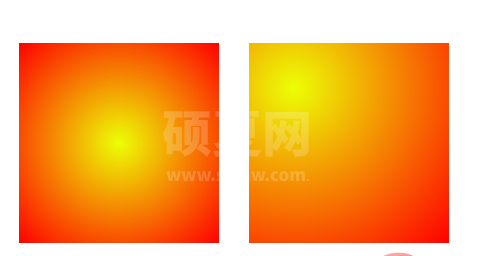
radial-gradient() CSS 函数创建了一个图像,该图像的颜色值由一个中心点(原点)向外扩散并逐渐过渡到其他颜色值。
同样至少需要定义两种颜色节点,也可以指定渐变的中心(默认在中心点,center)、形状(默认椭圆形 ellipse)、大小(默认 farthest-corner,表示到最远的角落)
语法
radial-gradient(
  [shape size at position] ?
  <color-stop-list> [ , <color-stop-list> ]+
)
shape:椭圆形(ellipse,默认)或圆形(circle)size:position:可以是具体的两个位置偏移值(10% 20%),也可以是关键字(left、right、top、bottom)
示例:背景色径向渐变--background-image+radial-gradient()
<!DOCTYPE html>
<html>
	<head>
		<meta charset="UTF-8">
		<title>css背景渐变--径向渐变</title>
		<style>
			.demo{
				width:500px ;
				height:200px;
				margin: 50px auto;
			}
			.demo *{
				width:200px ;
				height:200px;
				margin: 50px 15px;
				float: left;
			}
			.demo1{
				background-image: -moz-radial-gradient(#ecff05, red);
				background-image: -webkit-gradient(radial, center center, 0, center center, 220, from(#ecff05), to(red)); /* old */
				background-image: -webkit-radial-gradient(#ecff05, red); /* new syntax */
				background-image: radial-gradient(#ecff05, red);
			}
			.demo2{
				background-image: -moz-radial-gradient(45px 45px 45deg, circle cover, #ecff05 0%, orange 100%, red 95%);
				background-image: -webkit-radial-gradient(45px 45px, circle cover, #ecff05, red);
				background-image: radial-gradient(45px 45px 45deg, circle cover, #ecff05 0%, orange 100%, red 95%);
			}
		</style>
	</head>
	<body>
		<div class="demo">
			<div class="demo1"></div>
			<div class="demo2"></div>
		</div>
	</body>
</html>
重复渐变
重复多次渐变图案直到足够填满指定元素。由 repeating-linear-gradient() 和 repeating-radial-gradient() 函数产生。
重复函数的参数同上,不同的是它会基于渐变长度(最后一个色标和第一个之间的距离)倍数重复。
<!DOCTYPE html>
<html>
	<head>
		<meta charset="UTF-8">
		<title>css背景渐变--重复渐变</title>
		<style>
			.demo{
				width:500px ;
				height:200px;
				margin: 50px auto;
			}
			.demo *{
				width:200px ;
				height:200px;
				margin: 50px 15px;
				float: left;
			}
			.demo1{
				    background: repeating-linear-gradient(
				    to top left,
				    lightpink,
				    lightpink 5px,
				    white 5px,
				    white 10px
				  );
			}
			.demo2{
				   background: repeating-radial-gradient(
				    powderblue,
				    powderblue 8px,
				    white 8px,
				    white 16px
				  );
			}
		</style>
	</head>
	<body>
		<div class="demo">
			<div class="demo1"></div>
			<div class="demo2"></div>
		</div>
	</body>
</html>
(学习视频分享:css视频教程)
以上就是css3怎么将背景设置为渐变色的详细内容,更多请关注其它相关文章!
