Bootstrap中怎么使用Toasts组件?(示例讲解)
Bootstrap中怎么使用Toasts组件?下面本篇文章给大家介绍一下Bootstrap5中吐司消息Toasts组件的用法,希望对大家有所帮助!

1 吐司消息(Toasts)示例
吐司(Toasts)是一种轻量级通知,旨在模仿移动和桌面操作系统已经普及的推送通知。它们是用flexbox构建的,所以它们很容易对齐和定位。【相关推荐:《bootstrap教程》】
和弹出提示一样,吐司消息也需要自己初始化,不知为什么官网的初始化方法无效,我在国外网站找到一个可行的方法。
<!doctype html>
<html>
  <head>
    <meta charset="utf-8">
    <meta name="viewport" content="width=device-width, initial-scale=1">
    <meta name="keywords" content="">
    <meta name="description" content="">
    <link href="../bootstrap5/bootstrap.min.css" rel="stylesheet">
    <title>Popovers</title>
  </head>
  <body>
    <div>
        <br><br><br><br>
        <button type="button" class="btn btn-primary" id="liveToastBtn">显示吐司消息</button>
        <div class="position-fixed bottom-0 end-0 p-3" style="z-index: 5">
          <div id="liveToast" class="toast hide" data-bs-animation="false" role="alert" aria-live="assertive" aria-atomic="true">
            <div>
            <strong>吐司消息提示</strong>
            <small>11 mins ago</small>
            <button type="button" data-bs-dismiss="toast" aria-label="Close"></button>
            </div>
            <div>
            你有一条短消息!
            </div>
          </div>
        </div>

      </div>
     <script src="../bootstrap5/bootstrap.bundle.min.js" ></script>
     <script>
      document.querySelector("#liveToastBtn").onclick = function() {
        new bootstrap.Toast(document.querySelector('.toast')).show();
      }
   </script>
  </body>
</html>
2 设置选项
选项可以透过数据属性或是JavaScript传递。对于数据属性,将选项名称附加到data-bs-,如:data-bs-animation=""。
- data-bs-animation="true" 在吐司应用CSS fade转换效果
- data-bs-autohide="true" 自动将吐司隐藏
- data-bs-delay="5000" ,延迟隐藏吐司5s(默认单位毫秒)
以上值为默认值,如果你对磨人的效果满意,根本不需要写那个,27.3.1例子中,我设置了data-bs-autohide="false"设置不自动将吐司隐藏,这样好方便截图,否则鼠标只要在任何地方一点,消息框就消失了。
3 半透明的
吐司也可以是半透明的,因此能混合在它们可能出现的任何东西上。在支持CSS属性backdrop-filter的浏览器,还会尝试对吐司下方的元素进行模糊效果。
<!doctype html>
<html>
  <head>
    <meta charset="utf-8">
    <meta name="viewport" content="width=device-width, initial-scale=1">
    <meta name="keywords" content="">
    <meta name="description" content="">
    <link href="../bootstrap5/bootstrap.min.css" rel="stylesheet">
    <title>吐司消息</title>
  </head>
  <body>
    <div>
        <br><br><br><br>
        <button type="button" class="btn btn-primary" id="liveToastBtn">显示吐司消息</button>
        <div role="alert" aria-live="assertive" aria-atomic="true">
          <div>
          <strong>半透明吐司</strong>
          <small>11 mins ago</small>
          <button type="button" data-bs-dismiss="toast" aria-label="Close"></button>
          </div>
          <div>
            你有一条短消息!
          </div>
          </div>

      </div>
     <script src="../bootstrap5/bootstrap.bundle.min.js" ></script>
     <script>
      document.querySelector("#liveToastBtn").onclick = function() {
        new bootstrap.Toast(document.querySelector('.toast')).show();
      }
   </script>
  </body>
</html>
4 堆叠
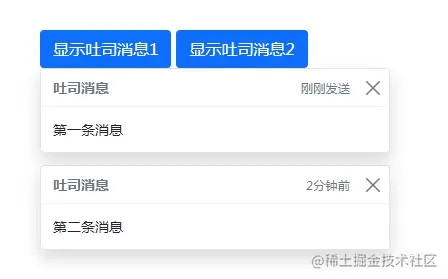
可以透过将吐司包装于toast-container容器来推叠它们,这将会在垂直方向上增加一些间距。
<!doctype html>
<html>
  <head>
    <meta charset="utf-8">
    <meta name="viewport" content="width=device-width, initial-scale=1">
    <meta name="keywords" content="">
    <meta name="description" content="">
    <link href="../bootstrap5/bootstrap.min.css" rel="stylesheet">
    <title>吐司消息</title>
  </head>
  <body>
    <div>
        <br><br><br><br>
        <button type="button" class="btn btn-primary" id="liveToastBtn1">显示吐司消息1</button>
        <button type="button" class="btn btn-primary" id="liveToastBtn2">显示吐司消息2</button>
        <div>
          <div id="toast1" role="alert" aria-live="assertive" aria-atomic="true">
          <div>
          <strong>吐司消息</strong>
          <small>刚刚发送</small>
          <button type="button" data-bs-dismiss="toast" aria-label="Close"></button>
          </div>
          <div>
          第一条消息
          </div>
          </div>

          <div  id="toast2" role="alert" aria-live="assertive" aria-atomic="true">
          <div>
          <strong>吐司消息</strong>
          <small>2分钟前</small>
          <button type="button" data-bs-dismiss="toast" aria-label="Close"></button>
          </div>
          <div>
            第二条消息
          </div>
          </div>
        </div>

      </div>
     <script src="../bootstrap5/bootstrap.bundle.min.js" ></script>
     <script>
       document.querySelector("#liveToastBtn1").onclick = function() {
        new bootstrap.Toast(document.querySelector('#toast1')).show();
      }
      document.querySelector("#liveToastBtn2").onclick = function() {
        new bootstrap.Toast(document.querySelector('#toast2')).show();
      }
   </script>
  </body>
</html>
5 自定义内容
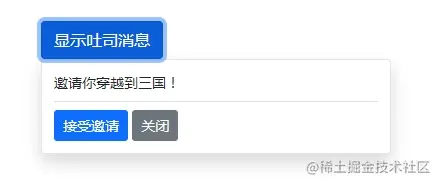
透过移除子元件、调整通用类或是增加标记以自定义吐司。
<!doctype html>
<html>
  <head>
    <meta charset="utf-8">
    <meta name="viewport" content="width=device-width, initial-scale=1">
    <meta name="keywords" content="">
    <meta name="description" content="">
    <link href="../bootstrap5/bootstrap.min.css" rel="stylesheet">
    <title>吐司消息</title>
  </head>
  <body>
    <div>
        <br><br><br><br>
        <button type="button" class="btn btn-primary" id="liveToastBtn">显示吐司消息</button>
        <div role="alert" aria-live="assertive" aria-atomic="true">
            <div>
            邀请你穿越到三国!
            <div class="mt-2 pt-2 border-top">
            <button type="button" class="btn btn-primary btn-sm">接受邀请</button>
            <button type="button" class="btn btn-secondary btn-sm" data-bs-dismiss="toast">关闭</button>
            </div>
            </div>
         </div>

      </div>
     <script src="../bootstrap5/bootstrap.bundle.min.js" ></script>
     <script>
      document.querySelector("#liveToastBtn").onclick = function() {
        new bootstrap.Toast(document.querySelector('.toast')).show();
      }
   </script>
  </body>
</html>
6 配色方案
基于以上的示例,您也可以透过我们的颜色通用类别建立不同的吐司配色方案。以下我们将bg-danger与text-white添加到toast,再把text-white添加到关闭按钮上。为了让边缘清晰显示,透过border-0移除了预设的边框。
<!doctype html>
<html>
  <head>
    <meta charset="utf-8">
    <meta name="viewport" content="width=device-width, initial-scale=1">
    <meta name="keywords" content="">
    <meta name="description" content="">
    <link href="../bootstrap5/bootstrap.min.css" rel="stylesheet">
    <title>吐司消息</title>
  </head>
  <body>
    <div>
        <br><br><br><br>
        <button type="button" class="btn btn-primary" id="liveToastBtn">显示吐司消息</button>

        <div class="toast align-items-center text-white bg-danger border-0" role="alert" aria-live="assertive" aria-atomic="true">
            <div>
            <div>
            这里是红色背景的
            </div>
            <button type="button" class="btn-close btn-close-white me-2 m-auto" data-bs-dismiss="toast" aria-label="Close"></button>
            </div>
        </div>

      </div>
     <script src="../bootstrap5/bootstrap.bundle.min.js" ></script>
     <script>
      document.querySelector("#liveToastBtn").onclick = function() {
        new bootstrap.Toast(document.querySelector('.toast')).show();
      }
   </script>
  </body>
</html>
7 设置显示位置
默认吐司消息显示在浏览器右下角,根据需求,使用自定义的CSS指定吐司位置。右上角通常用于通知,顶部的中间也是如此。如果您一次只要展示一个吐司,请将定位样式放在toast上。
<form>
<div class="mb-3">
<label for="selectToastPlacement">Toast placement</label>
<select class="form-select mt-2" id="selectToastPlacement">
<option value="" selected>Select a position/Uploads/...</option>
<option value="top-0 start-0">Top left</option>
<option value="top-0 start-50 translate-middle-x">Top center</option>
<option value="top-0 end-0">Top right</option>
<option value="top-50 start-0 translate-middle-y">Middle left</option>
<option value="top-50 start-50 translate-middle">Middle center</option>
<option value="top-50 end-0 translate-middle-y">Middle right</option>
<option value="bottom-0 start-0">Bottom left</option>
<option value="bottom-0 start-50 translate-middle-x">Bottom center</option>
<option value="bottom-0 end-0">Bottom right</option>
</select>
</div>
</form>
<div aria-live="polite" aria-atomic="true" class="bg-dark position-relative bd-example-toasts">
<div class="toast-container position-absolute p-3" id="toastPlacement">
<div class="toast">
<div class="toast-header">
  <img src="/Uploads/..." class="rounded me-2" alt="/Uploads/...">
  <strong class="me-auto">Bootstrap</strong>
  <small>11 mins ago</small>
</div>
<div class="toast-body">
  Hello, world! This is a toast message.
</div>
</div>
</div>
</div>
上面是官方例子,Bootstrap5 Toasts我也没找到其中驱动的js代码。不过可以给大家参考一下,有兴趣的可以去研究一下,在这里我根据上面的代码,修改了个显示在左上角的。
<!doctype html>
<html>
  <head>
    <meta charset="utf-8">
    <meta name="viewport" content="width=device-width, initial-scale=1">
    <meta name="keywords" content="">
    <meta name="description" content="">
    <link href="../bootstrap5/bootstrap.min.css" rel="stylesheet">
    <title>吐司消息</title>
  </head>
  <body>
    <div>
        <br><br><br><br>
        <button type="button" class="btn btn-primary" id="liveToastBtn">显示吐司消息</button>
        <div class="position-fixed top-0 start-0 p-3" style="z-index: 5">
          <div id="liveToast" class="toast hide" data-bs-animation="false" role="alert" aria-live="assertive" aria-atomic="true">
            <div>
            <strong>吐司消息提示</strong>
            <small>11 mins ago</small>
            <button type="button" data-bs-dismiss="toast" aria-label="Close"></button>
            </div>
            <div>
            你有一条短消息!
            </div>
          </div>
        </div>

      </div>
     <script src="../bootstrap5/bootstrap.bundle.min.js" ></script>
     <script>
      document.querySelector("#liveToastBtn").onclick = function() {
        new bootstrap.Toast(document.querySelector('.toast')).show();
      }
   </script>
  </body>
</html>
更多关于bootstrap的相关知识,可访问:bootstrap基础教程!!
以上就是Bootstrap中怎么使用Toasts组件?(示例讲解)的详细内容,更多请关注其它相关文章!
