基于Python通过cookie对某芯片网站信息的获取
芯片大家都不陌生。在当今疫情下,显卡,车机的芯片产量锐减影响了不少人的购物需求(反正你也买不到),也让不少人重新认识了半导体行业。闲来无事,我们可以获取一下T网站的芯片库存和芯片信息。
一、列表页请求分析
进入页面,就能看到我们需求的信息了。
但是,在页面请求完成之前,有一点点不对劲,就是页面的各个部份请求的速度是不一样的:
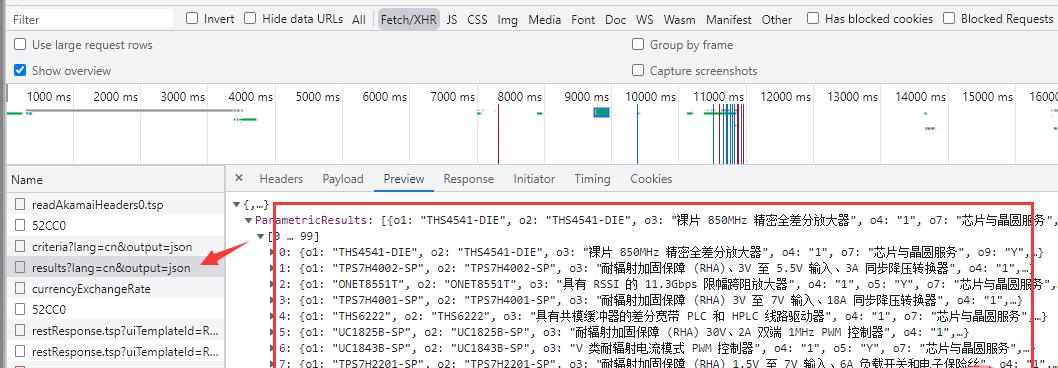
所以啊,需要的数据,大概率不是简单的get请求,所以要进一步去看,特意在开发者模式—Fetch/XHR选项卡中有一个请求,返回值正好是我们需要的内容:

这一条链接返回了所有的数据,无需翻页,下面开始请求链接。
二、列表页请求
根据上面的链接,直接get请求,分析json即可,上代码:

 def getItemList():
     url = "https://www.xx.com.cn/selectiontool/paramdata/family/3658/results?lang=cn&output=json"
     headers = {
         'authority': 'www.xx.com.cn',
         "accept": "text/html,application/xhtml+xml,application/xml;q=0.9,image/avif,image/webp,image/apng,*/*;q=0.8,application/signed-exchange;v=b3;q=0.9",
         "user-agent": "Mozilla/5.0 (Windows NT 10.0; Win64; x64) AppleWebKit/537.36 (KHTML, like Gecko) Chrome/96.0.4664.110 Safari/537.36",
     }
     res = getRes(url,headers,'','','GET')//自己写的请求方法
     nodes = res.json()['ParametricResults']
     for node in nodes:
         data = {}
         data["itemName"] = node["o3"] #名称
         data["inventory"] = node["p3318"] #库存
         data["price"] = node["p1130"]['multipair1']['l'] #价格
         data["infoUrl"] = f"https://www.xx.com.cn/product/cn/{node['o1']}"#详情URL
分析上面的json,可知 o3 是商品名,p3318是库存,p1130里面的内容有一个带单位的价格,o1是型号,可凑出详情链接,下面是请求结果:

三、详情页分析
终于拿到详情页链接了,该获取剩下的内容了。
打开开发者模式,没有额外的请求,只有一个包含内容的get请求。

那直接请求不就得了,上代码:
def getItemInfo(url):
    logger.info(f'正在请求详情url-{url}')
    headers = {
        'authority': 'www.xx.com.cn',
        'accept': "text/html,application/xhtml+xml,application/xml;q=0.9,image/avif,image/webp,image/apng,*/*;q=0.8,application/signed-exchange;v=b3;q=0.9",
        'user-agent': "Mozilla/5.0 (Windows NT 10.0; Win64; x64) AppleWebKit/537.36 (KHTML, like Gecko) Chrome/96.0.4664.110 Safari/537.36",
        'referer':'https://www.xx.com.cn/product/cn/THS4541-DIE',

    }
     res = getRes(url, headers,'', '', 'GET')//自己写的请求方法
     content = res.content.decode('utf-8')
但是发现,请求的详情页,跟开发者模式的预览怎么不太一样?

我这里的第一反应就觉得,完了,这个需要cookie。
继续分析,清屏开发者模式,清除cookie,再次访问详情链接,在All选项卡中,可以发现:

本以为该请求一次的详情页链接请求了两次,两次中间还有一个xhr请求。
预览第一次请求,可以发现跟刚才本地请求的内容相差无几:

所以问题出在第二次的请求,进一步分析:
查看第二次的get请求,与第一次的请求相差了一堆cookie

简化cookie,发现这些cookie最关键的参数是ak_bmsc这一部分,而这一部分参数,就来自上一个xhr请求中的响应头set-cookie中:

分析这个xhr请求,请求链接
这是个post请求,先从payload参数下手:

这个bm-verify参数,是不是有些眼熟?这就是第一次的get请求返回的内容吗,下面还有一个pow参数:

"pow":j,这个j参数就在上面,声明了i和两个拼接的数字字符串转成int之后相加之后的结果:

通过这一系列请求,返回了最终get请求所需要的cookie,讲的比较琐碎,上代码:
 #详情需要cookie
 def getVerify(url):
     infourl = url
     headers = {
         'authority': 'www.xx.com.cn',
         "accept": "text/html,application/xhtml+xml,application/xml;q=0.9,image/avif,image/webp,image/apng,*/*;q=0.8,application/signed-exchange;v=b3;q=0.9",
         "user-agent": "Mozilla/5.0 (Windows NT 10.0; Win64; x64) AppleWebKit/537.36 (KHTML, like Gecko) Chrome/96.0.4664.110 Safari/537.36",
     }
     proxies = getApiIp()//取代理
     if proxies:
         #无cookie访问详情页拿参数bm-verify,pow
         res = getRes(infourl,headers,proxies,'','GET')
         if res:
             #拿第一次请求的ak_bmsc
             cookie = re.findall("ak_bmsc=.*?;",res.headers['set-cookie'])[0]
             #拿bm-verify
             verifys = re.findall('"bm-verify": "(.*?)"', res.text)[0]
             #合并字符串转int相加取pow
             a = re.findall('var i = (\d+);',res.text)[0]
             b = re.findall('Number\("(.*?)"\);',res.text)[0]
             b = int(b.replace('" + "',''))
             pow = int(a)+b
             post_data = {
                 'bm-verify': verifys,
                 'pow':pow
             }
             #转json
             post_data = json.dumps(post_data)
             if verifys:
                 logger.info('第一次参数获取完毕')
                 return post_data,proxies,cookie
             else:
                 print('verify获取异常')
         else:
             print('verify请求出错')

 # 第二次带参数访问验证链接
 def getCookie(url):
     post_headers = {
         "authority": "www.xx.com.cn",
         "user-agent": "Mozilla/5.0 (Windows NT 10.0; Win64; x64) AppleWebKit/537.36 (KHTML, like Gecko) Chrome/97.0.4692.71 Safari/537.36",
         "accept": "*/*",
         "content-type": "application/json",
         "origin": "https://www.xx.com.cn",
         "referer":url,
     }
     post_data,proxies,c_cookie = getVerify(url)
     post_headers['Cookie'] = c_cookie
     posturl = "https://www.xx.com.cn/_sec/verify?provider=interstitial"
     check = getRes(posturl,post_headers,proxies,post_data,'POST')
     if check:
     #从请求头拿到ak_bmsc cookie
         cookie = check.headers['Set-Cookie']
         cookie = re.findall("ak_bmsc=.*?;",cookie)[0]
         if cookie:
             logger.info('Cookie获取完毕')
             return cookie,proxies
         else:
             print('cookie获取异常')
     else:
         print('cookie请求出错')
简单的概括一下详情页的请求流程:
第一次请求,取得所需参数bm-verify,pow,cookie,提供给下一次的post请求(getVerify方法)
第二次请求,根据已知条件进行post请求,并获取响应头cookie的ak_bmsc(getCookie)
切记,在整个获取cookie的三次请求过程中,第二、三两次请求都需要伴随着上一次请求的ak_bmsc作为cookie传递,第二次请求需要第一次的ak_bmsc,最终请求需要第二次的ak_bmsc。
四、详情页请求
 def getItemInfo(url):
     logger.info(f'正在请求详情url-{url}')
     cookie,proxies = getCookie(url)
     headers = {
         'authority': 'www.xx.com.cn',
         'accept': "text/html,application/xhtml+xml,application/xml;q=0.9,image/avif,image/webp,image/apng,*/*;q=0.8,application/signed-exchange;v=b3;q=0.9",
         'user-agent': "Mozilla/5.0 (Windows NT 10.0; Win64; x64) AppleWebKit/537.36 (KHTML, like Gecko) Chrome/96.0.4664.110 Safari/537.36",
         'referer':'https://www.xx.com.cn/product/cn/THS4541-DIE',
         'cookie':cookie
     }
     res = getRes(url, headers,proxies, '', 'GET')
     content = res.content.decode('utf-8')
     print(content)
     exit()
     sel = Selector(text=content)
     Parameters = sel.xpath('//ti-tab-panel[@tab-title="参数"]/ti-view-more/div').extract_first()
     Features = sel.xpath('//ti-tab-panel[@tab-title="特性"]/ti-view-more/div').extract_first()
     Description = sel.xpath('//ti-tab-panel[@tab-title="描述"]/ti-view-more').extract_first()
     if Parameters and Features and Description:
         return Parameters,Features,Description
通过上一步cookie的获取,带着cookie再次访问详情链接,就可以顺利的获取内容并可以使用xpath进行解析,获取需要的内容。
五、代理设置
T网站详情页带cookie请求有100多次,如果用本地代理一直去请求,会有IP封锁的可能性出现,导致无法正常获取。所以,需要高效请求的话,优质稳定的代理IP必不可少,我这里使用的ipidea代理请求的T网站,数据很快就访问出来了。
地址:http://www.ipidea.net/?utm-source=PHP&utm-keyword=?PHP ,首次可以白嫖流量哦。本次使用的api获取,代码如下:
 # api获取ip
 def getApiIp():
     # 获取且仅获取一个ip
     api_url = 'http://tiqu.ipidea.io:81/abroad?num=1&type=2&lb=1&sb=0&flow=1®ions=&port=1'
     res = requests.get(api_url, timeout=5)
     try:
         if res.status_code == 200:
             api_data = res.json()['data'][0]
             proxies = {
                 'http': 'http://{}:{}'.format(api_data['ip'], api_data['port']),
                 'https': 'http://{}:{}'.format(api_data['ip'], api_data['port']),
             }
             print(proxies)
             return proxies
         else:
             print('获取失败')
     except:
         print('获取失败')
六、代码汇总
 # coding=utf-8
 import requests
 from scrapy import Selector
 import re
 import json
 from loguru import logger

 # api获取ip
 def getApiIp():
     # 获取且仅获取一个ip
     api_url = '获取代理地址'
     res = requests.get(api_url, timeout=5)
     try:
         if res.status_code == 200:
             api_data = res.json()['data'][0]
             proxies = {
                 'http': 'http://{}:{}'.format(api_data['ip'], api_data['port']),
                 'https': 'http://{}:{}'.format(api_data['ip'], api_data['port']),
             }
             print(proxies)
             return proxies
         else:
             print('获取失败')
     except:
         print('获取失败')

 def getItemList():
     url = "https://www.xx.com.cn/selectiontool/paramdata/family/3658/results?lang=cn&output=json"
     headers = {
         'authority': 'www.xx.com.cn',
         "accept": "text/html,application/xhtml+xml,application/xml;q=0.9,image/avif,image/webp,image/apng,*/*;q=0.8,application/signed-exchange;v=b3;q=0.9",
         "user-agent": "Mozilla/5.0 (Windows NT 10.0; Win64; x64) AppleWebKit/537.36 (KHTML, like Gecko) Chrome/96.0.4664.110 Safari/537.36",
     }
     proxies = getApiIp()
     if proxies:
         # res = requests.get(url, headers=headers, proxies=proxies)
         res = getRes(url,headers,proxies,'','GET')
         nodes = res.json()['ParametricResults']
         for node in nodes:
             data = {}
             data["itemName"] = node["o3"] #名称
             data["inventory"] = node["p3318"] #库存
             data["price"] = node["p1130"]['multipair1']['l'] #价格
             data["infoUrl"] = f"https://www.ti.com.cn/product/cn/{node['o1']}"#详情URL
             Parameters, Features, Description = getItemInfo(data["infoUrl"])
             data['Parameters'] = Parameters
             data['Features'] = Features
             data['Description'] = Description
             print(data)

 #详情需要cookie
 def getVerify(url):
     infourl = url
     headers = {
         'authority': 'www.xx.com.cn',
         "accept": "text/html,application/xhtml+xml,application/xml;q=0.9,image/avif,image/webp,image/apng,*/*;q=0.8,application/signed-exchange;v=b3;q=0.9",
         "user-agent": "Mozilla/5.0 (Windows NT 10.0; Win64; x64) AppleWebKit/537.36 (KHTML, like Gecko) Chrome/96.0.4664.110 Safari/537.36",
     }
     proxies = getApiIp()
     if proxies:
         #访问详情页拿参数bm-verify,pow
         res = getRes(infourl,headers,proxies,'','GET')
         if res:
             #拿第一次请求的ak_bmsc
             cookie = re.findall("ak_bmsc=.*?;",res.headers['set-cookie'])[0]
             #拿bm-verify
             verifys = re.findall('"bm-verify": "(.*?)"', res.text)[0]
             #字符串转int相加取pow
             a = re.findall('var i = (\d+);',res.text)[0]
             b = re.findall('Number\("(.*?)"\);',res.text)[0]
             b = int(b.replace('" + "',''))
             pow = int(a)+b
             post_data = {
                 'bm-verify': verifys,
                 'pow':pow
             }
             #转json
             post_data = json.dumps(post_data)
             if verifys:
                 logger.info('第一次参数获取完毕')
                 return post_data,proxies,cookie
             else:
                 print('verify获取异常')
         else:
             print('verify请求出错')

 # 第二次带参数访问验证链接
 def getCookie(url):
     post_headers = {
         "authority": "www.xx.com.cn",
         "user-agent": "Mozilla/5.0 (Windows NT 10.0; Win64; x64) AppleWebKit/537.36 (KHTML, like Gecko) Chrome/97.0.4692.71 Safari/537.36",
         "accept": "*/*",
         "content-type": "application/json",
         "origin": "https://www.xx.com.cn",
         "referer":url,
     }
     post_data,proxies,c_cookie = getVerify(url)
     post_headers['Cookie'] = c_cookie
     posturl = "https://www.xx.com.cn/_sec/verify?provider=interstitial"
     check = getRes(posturl,post_headers,proxies,post_data,'POST')
     if check:
     #从请求头拿到ak_bmsc cookie
         cookie = check.headers['Set-Cookie']
         cookie = re.findall("ak_bmsc=.*?;",cookie)[0]
         if cookie:
             logger.info('Cookie获取完毕')
             return cookie,proxies
         else:
             print('cookie获取异常')
     else:
         print('cookie请求出错')

 def getItemInfo(url):
     logger.info(f'正在请求详情url-{url}')
     cookie,proxies = getCookie(url)
     headers = {
         'authority': 'www.xx.com.cn',
         'accept': "text/html,application/xhtml+xml,application/xml;q=0.9,image/avif,image/webp,image/apng,*/*;q=0.8,application/signed-exchange;v=b3;q=0.9",
         'user-agent': "Mozilla/5.0 (Windows NT 10.0; Win64; x64) AppleWebKit/537.36 (KHTML, like Gecko) Chrome/96.0.4664.110 Safari/537.36",
         'referer':'https://www.xx.com.cn/product/cn/THS4541-DIE',
         'cookie':cookie
     }
     res = getRes(url, headers,proxies, '', 'GET')
     content = res.content.decode('utf-8')
     sel = Selector(text=content)
     Parameters = sel.xpath('//ti-tab-panel[@tab-title="参数"]/ti-view-more/div').extract_first()
     Features = sel.xpath('//ti-tab-panel[@tab-title="特性"]/ti-view-more/div').extract_first()
     Description = sel.xpath('//ti-tab-panel[@tab-title="描述"]/ti-view-more').extract_first()
     if Parameters and Features and Description:
         return Parameters,Features,Description

 #专门发送请求的方法,代理请求三次,三次失败返回错误
 def getRes(url,headers,proxies,post_data,method):
     if proxies:
         for i in range(3):
             try:
                 # 传代理的post请求
                 if method == 'POST':
                     res = requests.post(url,headers=headers,data=post_data,proxies=proxies)
                 # 传代理的get请求
                 else:
                     res = requests.get(url, headers=headers,proxies=proxies)
                 if res:
                     return res
             except:
                 print(f'第{i}次请求出错')
             else:
                 return None
     else:
         for i in range(3):
             proxies = getApiIp()
             try:
                 # 请求代理的post请求
                 if method == 'POST':
                     res = requests.post(url, headers=headers, data=post_data, proxies=proxies)
                 # 请求代理的get请求
                 else:
                     res = requests.get(url, headers=headers, proxies=proxies)
                 if res:
                     return res
             except:
                 print(f"第{i}次请求出错")
             else:
                 return None

 if __name__ == '__main__':
    getItemList()
通过上述步骤,已经能获取所需内容。
总结
整个T网站的数据获取,难点就在详情页的cookie,(其实也不是很难,只不过cookie太长比较费眼)理顺了整个请求流程,剩下的就是请求的过程。稳定高效的IP代理会让你事半功倍,通过api获取可变的代理也不易被网站封禁,从而更好地获取数据。简化cookie的时候使用合适的请求工具会更方便,比如postman,burp。
这次的整个流程到此结束,讲的比较啰嗦,若有错误或者更好的方法请大佬指正!
【相关推荐:Python3视频教程 】
以上就是基于Python通过cookie对某芯片网站信息的获取的详细内容,更多请关注其它相关文章!
