如何开始使用Python中的Nose
译者 | 李睿
审校 | 孙淑娟
在这个Python Nose教程中,将深入研究Nose框架。Nose是一个测试自动化框架,它扩展了unittest,并进一步利用Nose来执行Selenium测试自动化。
许多开发人员在Selenium测试自动化中面临的一个挑战是如何选择正确的测试框架,以帮助他们以最少(或不需要)的样板代码完成自动化测试。大多数人都会遇到测试代码,并不得不编写大量代码来执行简单的测试。
选择正确的测试自动化框架可以显著地简化开发人员处理测试代码的工作。可以利用框架功能编写测试,以最少的实现来执行工作。就Selenium Python测试而言,有PyUnit、Pytest、Robot、Cucumber等几种测试自动化框架可供选择。
Python的标准unittest模块被其他Python测试自动化框架所取代,因为它需要大量样板代码,并且其测试必须包含在大型测试类中。如果开发人员仍想使用默认的Python单元测试框架,Nose则是一种流行的替代方案。它具有一组强大的功能,可以扩展unittest以使测试更容易。在这个Python Nose教程中,深入探讨了Nose框架以及如何利用Nose更有效地执行Selenium测试自动化(使用unittest)。
一、Nose框架简介
Nose是Python中一个流行的测试自动化框架,它扩展了unittest以使测试更容易。使用Nose框架的其他优点是支持自动发现测试用例和文档收集。
Nose框架具有丰富的插件集,可以帮助执行测试、并行(或多进程)测试、日志记录和报告等。它还可以运行文档测试、单元测试以及非样板测试。这些插件还添加了对decorators、Fixtures、参数化测试、类和模块的支持。

Nose的最新版本是Nose 2,但是,开发人员和测试生态系统中的很大一部分仍在使用旧版本的Nose,即1.3.7版。
因此,用于Selenium测试自动化的Python Nose教程系列分为两部分,这一部分着重于使用Nose1.3.7进行Selenium Python测试。
1.如何安装Nose框架
可以通过在终端上执行以下命令来安装Nose框架:
pip install nose
如下面的安装屏幕截图所示,安装的版本是1.3.7。由于nose和nose 2是两个独立的项目,所以安装命令不一样。

可以在代码中使用import nose来导入Nose包,但是这一步是可选的。如果在Nose中使用特定模块,则必须在代码中使用import Nose.
2.如何进行Nose测试
由于为现有的Python发行版以及nosetests.exe安装了Nose模块,因此可以通过触发以下任一命令来执行使用Nose框架的测试:
(1)选项1
Shell
1 nosetests <file_name.py>
(2)选项2
Shell
1 python -m nose <file_name.py>
3.使用Nose框架进行测试发现
以下是测试发现的一些简单规则:
- 与其他Python自动化框架一样,Nose也会自动执行父文件夹(及其子文件夹)中存在的所有测试。
- 框架选择的模块(或文件)应以“test_”开头。
- 测试方法必须以“test_”开头。
- 包含测试方法的测试类应以“test”开头。
这些是将用于使用Nose的Selenium python测试的一些命名约定。这组规则足以实现测试自动化,人们可以在Nose网站的“查找测试”部分查看完整的规则集。
4.Nose框架的示例用法
unittest框架中遵循的命名法也适用于Nose框架。
为了演示这个Python Nose教程中Nose框架的使用,使用了一个简单的Selenium测试自动化示例,其中执行Google搜索“LambdaTest”并在第一个结果上执行点击操作。
Python
1 from selenium import webdriver
2 import time
3 from time import sleep
4 from selenium.webdriver.common.by import By
5
6 def test_google_search():
7driver = webdriver.Chrome()
8driver.get('https://www.google.com')
9 driver.maximize_window()
10 title = "Google"
11 assert title == driver.title
12
13 search_text = "LambdaTest"
14 # search_box = driver.find_element_by_xpath("//input[@name='q']")
15 search_box = driver.find_element(By.XPATH, "//input[@name='q']")
16 search_box.send_keys(search_text)
17
18 # Using Sleep is not a good programming practice
19 # Only used here for demonstration purpose
20 time.sleep(5)
21 search_box.submit()
22
23 time.sleep(5)
24
25 # Click on the LambdaTest HomePage Link
26 # This test will fail as the titles will not match
27 title = "Most Powerful Cross Browser Testing Tool Online | LambdaTest"
28 # lt_link = driver.find_element_by_xpath("//h3[.='LambdaTest: Most Powerful Cross Browser Testing Tool Online']")
29 lt_link = driver.find_element(By.XPATH, "//h3[.='LambdaTest: Most Powerful Cross Browser Testing Tool Online']")
30 lt_link.click()
31
32 time.sleep(10)
33 assert title == driver.title
34 time.sleep(2)
35
36 # Release the resources in the teardown function
37 print("TearDown initiated")
38 driver.quit()
39
左右滑动查看完整代码
从实现中可以看出,没有导入Nose模块。该实现与其他Python自动化框架使用的实现或多或少相同。因此,不会更深入地研究测试的实现方面。下图为执行截图:

使用Nose(超过标准unittest模块)的主要优点是它自动收集测试,可以灵活地编写不是unittest.TestCase子类的简单测试函数或测试类。
二、Nose框架中的Fixtures
Nose框架在测试、包、类和模块级别支持Fixtures(setup和teardown方法)。这有助于消除不必要的初始化,如果频繁执行这些初始化可能会妨碍测试的性能。
与py.test或unittest Fixtures一样,setup方法总是在任何测试(或测试集合)之前运行,并且如果setup方法成功执行,则运行teardown方法。这与测试运行的状态无关。Nose扩展了设置(和拆卸)的单元测试Fixtures模型。
Fixtures可以在以下级别实现:
1.测试包
可以将测试分组到测试包中。因此,测试包的setup和teardown方法在每次测试运行时运行一次,而不是创建每个模块或测试用例运行一次的setup和teardown方法。
要为测试包执行创建setup和teardown,应在测试包的__init__.py中定义相应的方法。其命名法如下:
Python
1 Setup - setup, setup_package, setUp, or setUpPackage
2 TearDown - teardown, teardown_package, tearDown or tearDownPackage
2.测试模块
这可以在测试包级别定义setup和teardown方法。相应的方法将在模块的开头和结尾执行。其命名法如下:
Python
1 Setup - setup, setup_module, setUp or setUpModule
2 TearDown - teardown, teardown_module, or tearDownModule
3.测试函数
这使开发人员可以在函数级别定义setup和teardown。顾名思义,setup_function和teardown_function在测试函数调用之前和之后执行。
没有特定的命名约定,除了必须使用从Nose导入的@with_setupdecorators应用setup方法。它是一种广泛使用的decorators,以下将在接下来的示例中演示它的用法。
4.测试类
测试类是在测试模块中定义的与test_Match匹配的类,或者是unittest.TestCase的子类。各自的setup和teardown函数在测试方法类的开始和结束时运行。以下是类级设置Fixtures的命名法:
Python
1 Setup - setup_class, setupClass, setUpClass, setupAll (or setUpAll)
2 TearDown - teardown_class, teardownClass, tearDownClass, teardownAll (or tearDownAll)
除了遵循正确的命名约定之外,setup方法应该与@classmethoddecorators一起应用。
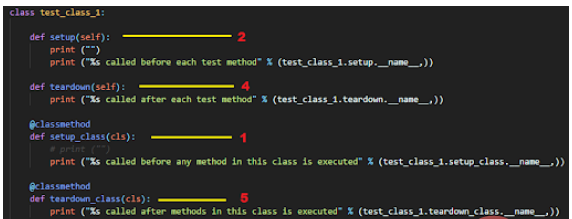
为了演示Fixtures的用法,在不同的层次上使用了Nose fixtures——类、模块和方法。
Python
1 import nose
2 from nose.tools import with_setup
3
4 # Can also be setup, setup_module, setUp or setUpModule
5 def setUpModule(module):
6 print ("")
7 print ("%s" % (setUpModule.__name__,))
8
9 # Can also be teardown, teardown_module, or tearDownModule
10 def tearDownModule(module):
11 print ("%s" % (tearDownModule.__name__,))
12
13 def setup_func():
14 print ("%s" % (setup_func.__name__,))
15
16 def teardown_func():
17 print ("%s" % (teardown_func.__name__,))
18
19 @with_setup(setup_func, teardown_func)
20 def test_case_1():
21 print ("%s" % (test_case_1.__name__,))
22
23 class test_class_1:
24
25 def setup(self):
26 print ("%s called before each test method" % (test_class_1.setup.__name__,))
27
28 def teardown(self):
29 print ("%s called after each test method" % (test_class_1.teardown.__name__,))
30
31 @classmethod
32 def setup_class(cls):
33 print ("%s called before any method in this class is executed" % (test_class_1.setup_class.__name__,))
34
35 @classmethod
36 def teardown_class(cls):
37 print ("%s called after methods in this class is executed" % (test_class_1.teardown_class.__name__,))
38
39 def test_case_2(self):
40 print ("%s" % (test_class_1.test_case_2.__name__,))
使用nosetests.exe中的-s(或-nocapture)选项,以便立即捕获任何stdout输出。以下命令用于触发执行:
Python
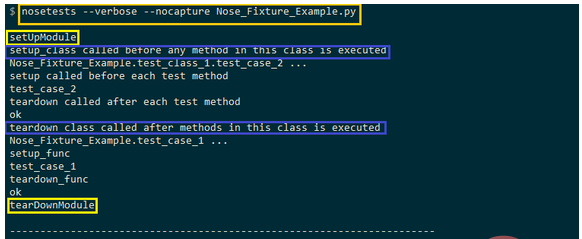
1 nosetests --verbose --nocapture Nose_Fixture_Example.py
这是输出屏幕截图:

如进行的截图所示,模块级setup方法在执行开始时运行,而模块级teardown方法在执行结束时运行。对于测试方法test_case_2(它是test_class_1的一部分),setup_class()方法在测试方法被触发之前被调用。
在发布这一消息之后,将执行方法级设置方法(即test_class_1的一部分)。相应的teardown方法以类似的顺序调用(即首先执行方法级teardown方法,然后执行类级teardown方法)。

三、Nose Fixtures演示
为了演示这一Python Nose教程中Fixtures的用法,使用了一个包含两个测试用例的跨浏览器测试示例:
1.测试用例–1
(1)导航到URL:Google.com。
(2)搜索“LambdaTest”。
(3)点击标题为-LambdaTest的搜索结果:强大的跨浏览器在线测试工具
(4)确定新打开的窗口的标题是否与预期的标题不匹配
2.测试用例–2
(1)导航到URL;Lambdatest GitHub
(2)选中前两个复选框
(3)将“在LambdaTest进行快乐测试”发送到id=sampletodotext的文本框
(4)单击添加按钮,并验证是否已添加文本
执行
Python
1 from nose.tools import with_setup
2 from selenium import webdriver
3 import time
4 from time import sleep
5 from selenium.webdriver.common.by import By
6
7 def setup_func():
8 global driver
9print("setup_func: setUp Method called")
10 driver = webdriver.Chrome()
11 driver.maximize_window()
12
13 def teardown_func():
14 global driver
15 print("teardown_func: Teardown Method called")
16 driver.quit()
17
18 @with_setup(setup_func, teardown_func)
19 def test_1():
20 global driver
21 print("test_1: Initiated")
22 driver.get('https://www.google.com')
23 title = "Google"
24 assert title == driver.title
25
26 search_text = "LambdaTest"
27 search_box = driver.find_element(By.XPATH,"//input[@name='q']")
28 search_box.send_keys(search_text)
29
30 # Using Sleep is not a good programming practice
31 # Only used here for demonstration purpose
32 time.sleep(5)
33 search_box.submit()
34
35 time.sleep(5)
36
37 # Click on the LambdaTest HomePage Link
38 # This test will fail as the titles will not match
39 title = "Most Powerful Cross Browser Testing Tool Online | LambdaTest"
40 lt_link = driver.find_element(By.XPATH,"//h3[.='LambdaTest: Most Powerful Cross Browser Testing Tool Online']")
41 lt_link.click()
42
43 time.sleep(10)
44 assert title == driver.title
45 time.sleep(2)
46
47 @with_setup(setup_func, teardown_func)
48 def test_2():
49 global driver
50 print("test_2: Initiated")
51driver.get('https://lambdatest.github.io/sample-todo-app/')
52
53driver.find_element(By.NAME,"li1").click()
54driver.find_element(By.NAME,"li2").click()
55
56 title = "Sample page - lambdatest.com"
57 assert title == driver.title
58
59 sample_text = "Happy Testing at LambdaTest"
60 email_text_field =driver.find_element(By.ID, "sampletodotext")
61 email_text_field.send_keys(sample_text)
62 time.sleep(5)
63
64 driver.find_element(By.ID, "addbutton").click()
65 time.sleep(5)
66
67 assert driver.find_element(By.XPATH, "//span[.='Happy Testing at LambdaTest']").text == sample_text
代码演练
首先,从nose.tools模块导入with_setup方法。setup_func()和teardown_func()方法用作在函数级别实现的Fixture函数。
Python
1 from nose.tools import with_setup
2 .................................
3
4 def setup_func():
5global driver
6print("setup_func: setUp Method called")
7driver = webdriver.Chrome()
8driver.maximize_window()
9
10 def teardown_func():
11 global driver
12 print("teardown_func: Teardown Method called")
13 driver.quit()
Chrome Web Driver实例在setup_func()方法中启动,其资源在teardown_func()方法中释放。@with_setupdecorators用于将设置(即setup_func)和拆卸(teardown_func)方法添加到相应的测试函数中。
Python
1 @with_setup(setup_func, teardown_func)
2 def test_1():
3 ..........................
4 ..........................
5 ..........................
6
7 @with_setup(setup_func, teardown_func)
8 def test_2():
9 ..........................
10 ..........................
11 ..........................
Chrome中的检查工具用于查找必要Web元素的详细信息。

Selenium Webdriver API,例如find_element、send_keys等,用于定位所需的Web元素并对这些元素执行所需的操作。在Python Nose教程中,不会深入研究实现,因为它独立于用于Selenium Python测试的测试框架。
执行
以下命令用于触发测试执行:
Shell
1 nosetests --verbose --nocapture <file-name.py>
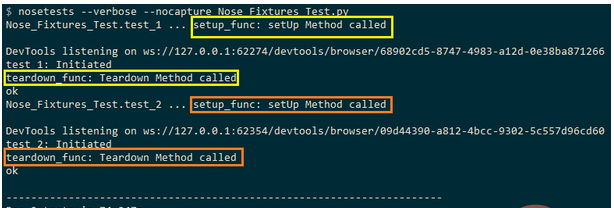
下图为执行截图:

在执行测试用例之前,会调用相应的setup方法(即setup_func)。一旦测试函数的执行完成,就会调用相应的teardown方法(即teardown_func)。
四、使用Nose框架进行参数化测试
Nose框架(1.3.7版)不直接支持参数化测试。参数化(以前称为Nose参数化)包用于使用Nose执行参数化测试。除了Nose,该包还支持Python中所有流行的测试自动化框架。
通过在终端上发出以下命令来安装参数化包:
Shell
1 pip install parameterized
参数化包的最新版本是0.7.4。

1.本地Selenium网格上的Nose参数化测试
将针对这个Python Nose教程在Lambda Test上测试ToDo应用程序,面向三种不同的浏览器进行测试:Firefox、Microsoft Edge和Chrome。以下是测试场景的概述:
(1)导航到URL https://lambdatest.github.io/sample-todo-app/
(2)选中前两个复选框
(3)将“在Lambda Test进行快乐测试”发送到id=sampletodotext的文本框
(4)单击添加按钮并验证是否已添加文本
执行
Python
1 # test_math.py
2 from nose.tools import assert_equal
3 from parameterized import parameterized, parameterized_class
4 import unittest
5 from nose.tools import with_setup
6 from selenium import webdriver
7 import time
8 from time import sleep
9 from selenium.webdriver.common.by import By
10
11 def teardown_func():
12 global driver
13 print("teardown_func: Teardown Method called")
14 driver.quit()
15
16 @parameterized([
17 ("Firefox"),
18 ("Chrome"),
19 ("MicrosoftEdge"),
20 ])
21
22 @with_setup(None, teardown_func)
23 def test_to_do_app(browserName):
24 global driver
25
26 if (browserName == "Chrome"):
27 print("Test on Chrome Browser initiated")
28 driver = webdriver.Chrome()
29 elif (browserName == "MicrosoftEdge"):
30 print("Test on Edge Browser initiated")
31 # Set the Path accordingly
32 driver = webdriver.Edge("C:\EdgeDriver\MicrosoftWebDriver.exe")
33
elif (browserName == "Firefox"):
34 print("Test on Firefox initiated")
35 driver = webdriver.Firefox()
36 driver.get('https://lambdatest.github.io/sample-todo-app/')
37 driver.maximize_window()
38
39 driver.find_element(By.NAME, "li1").click()
40 driver.find_element(By.NAME, "li2").click()
41
42 title = "Sample page - lambdatest.com"
43 assert title == driver.title
44
45 sample_text = "Happy Testing at LambdaTest"
46 email_text_field =driver.find_element(By.ID, "sampletodotext")
47 email_text_field.send_keys(sample_text)
48 time.sleep(5)
49
50 driver.find_element(By.ID, "addbutton").click()
51 time.sleep(5)
52
53 assert driver.find_element(By.XPATH, "//span[.='Happy Testing at LambdaTest']").text == sample_text
代码演练
parameterized和parameterized_class模块是从参数化包中导入的。
Python
1 from parameterized import parameterized, parameterized_class
使用了函数级别的Fixture,主要区别在于@with_setup decorators将只有teardown方法,因为不同的测试浏览器使用@parameterized decorators传递给测试函数。
Python
1 def teardown_func():
2 global driver
3 print("teardown_func: Teardown Method called")
4 driver.quit()
5
6 @parameterized([
7 ("Firefox"),
8 ("Chrome"),
9("MicrosoftEdge"),
10
])
测试浏览器的名称作为参数传递给测试函数(即test_to_do_app)。测试函数针对每个浏览器组合执行一次,设置期间使用的资源在teardown方法(即teardown_func)中释放。
根据Selenium测试自动化所针对的浏览器,启动相应的WebDriver实例。
Python
1 @with_setup(None, teardown_func)
2 ef test_to_do_app(browserName):
3 lobal driver
4
5 f (browserName == "Chrome"):
6 rint("Test on Chrome Browser initiated")
7iver = webdriver.Chrome()
8 lif (browserName == "MicrosoftEdge"):
9 print("Test on Edge Browser initiated")
10 # Set the Path accordingly
11 driver = webdriver.Edge("C:\EdgeDriver\MicrosoftWebDriver.exe")
12 lif (browserName == "Firefox"):
13 rint("Test on Firefox initiated")
14 river = webdriver.Firefox()其余实现相同,仅与Selenium自动化测试相关。这是输出快照:

2.基于云的Selenium网格上的Nose参数化测试
本地Selenium网络基础设施上的Selenium测试自动化可能会遇到障碍,因为扩展内部基础设施需要大量投资。这是因为必须使用大量不同的浏览器、浏览器版本和设备及时更新基础设施。
一种更具可扩展性的方法来充分发挥Selenium Python测试的潜力,是利用并行化以及基于云的远程Selenium网格支持的功能。LambdaTest就是这样一种基于云的跨浏览器测试平台,可让跨3,000多种不同的浏览器、操作系统和设备组合执行Selenium测试自动化。
将在本地Selenium网格上测试的工作测试实现移植到基于云的远程Selenium网格所涉及的工作量很小,因为代码更改主要与基础架构相关。
为了开始在LambdaTest上进行测试,必须在LambdaTest上创建一个配置文件,并记下配置文件部分中的用户名和访问密钥。访问密钥和密码的组合用于访问LambdaTest上的Selenium网格。LambdaTest仪表板提供了与在Selenium网格上执行的测试相关的所有详细信息。LambdaTest功能生成器用于生成Selenium自动化测试所需的浏览器和平台功能。
在这个Python Nose教程中,将在LambdaTest上演示参数化测试。首先,在这些浏览器+操作系统组合上执行前面部分中使用的测试用例:
Python
1 @parameterized([
2("Chrome", "83.0", "Windows 10"),
3("MicrosoftEdge", "81.0", "macOS High Sierra"),
4 ("Safari", "12.0", "macOS Mojave"),
5("Firefox", "76.0", "Windows 10"),
6 ])
实施
Python
1 # test_math.py
2 from nose.tools import assert_equal
3 from parameterized import parameterized, parameterized_class
4 from nose.tools import with_setup
5 from selenium import webdriver
6 import time
7 from time import sleep
8 import urllib3
9 import warnings
10 from selenium.webdriver.common.by import By
11
12 def setup_func():
13 global driver
14 global remote_url
15 print("setup_func: SetUp Method called")
16 # Details can be sourced from https://automation.lambdatest.com/
17 user_name = "user-name"
18 app_key = "pass-key"
19 remote_url = "https://" + user_name + ":" + app_key + "@hub.lambdatest.com/wd/hub"
20urllib3.disable_warnings(urllib3.exceptions.InsecureRequestWarning)
21
22 def teardown_func():
23 global driver
24 print("teardown_func: Teardown Method called")
25 driver.quit()
26
27 @parameterized([
28 ("Firefox", "76.0", "Windows 10"),
29 ("Chrome", "83.0", "Windows 10"),
30 ("MicrosoftEdge", "81.0", "macOS High Sierra"),
31 ("Safari", "12.0", "macOS Mojave"),
32 ])
33
34 @with_setup(setup_func, teardown_func)
35 def test_to_do_app(browserName, version, platform):
36 global driver
37 global remote_url
38
39 capabilities = {}
40 # Set the desired capabilities from the supplied parameters
41 capabilities["browserName"] = browserName
42 capabilities["version"] = version
43 capabilities["platform"] = platform
44
45 driver = webdriver.Remote(command_executor = remote_url, desired_capabilities = capabilities)
46 driver.get('https://lambdatest.github.io/sample-todo-app/')
47 driver.maximize_window()
48
49 driver.find_element(By.NAME, "li1").click()
50 driver.find_element(By.NAME, "li2").click()
51
52 title = "Sample page - lambdatest.com"
53
assert title ==driver.title
54
55 sample_text = "Happy Testing at LambdaTest"
56 email_text_field = driver.find_element(By.ID, "sampletodotext")
57 email_text_field.send_keys(sample_text)
58 time.sleep(5)
59
60 driver.find_element(By.ID, "addbutton").click()
61 time.sleep(5)
62
63 assert driver.find_element(By.XPATH, "//span[.='Happy Testing at LambdaTest']").text == sample_text
代码演练
由于测试是在基于云的Selenium网格上执行的,因此由用户名和密码组合组成的凭据用于访问LambdaTest网格URL–@hub.lambdatest.com/wd/hub
Python
1 remote_url = "https://" + user_name + ":" + app_key + "@hub.lambdatest.com/wd/hub"
远程 WebDriver 使用功能生成器生成的远程URL 和浏览器功能。
Python
1 driver = webdriver.Remote(command_executor = remote_url, desired_capabilities = capabilities)
测试用例采用三个输入参数——浏览器名称、浏览器版本和平台名称。这些条目构成了作为参数传递给WebDriver API的所需功能。
Python
1 @with_setup(setup_func, teardown_func)
2 def test_to_do_app(browserName, version, platform):
3 .........................
4 .........................
5 capabilities = {}
6 # Set the desired capabilities from the supplied parameters
7 capabilities["browserName"] = browserName
8 capabilities["version"] = version
9 capabilities["platform"] = platform
10
11 driver = webdriver.Remote(command_executor = remote_url, desired_capabilities = capabilities)
12 driver.get('https://lambdatest.github.io/sample-todo-app/')
13 .........................
14 .........................
实现的其余部分是不言自明的,因为它使用相关的Selenium WebDriver API来定位所需的Web元素并对其执行相关操作。
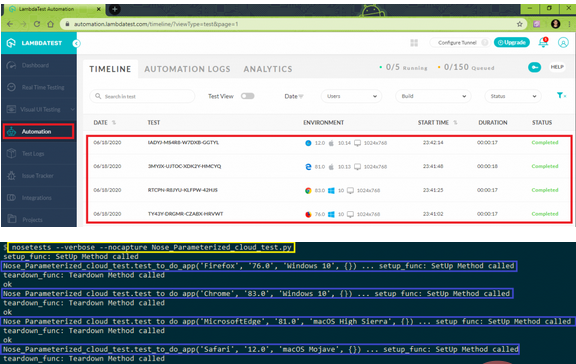
执行截图如下:

五、基于云的Selenium网格上的并行测试
与Python等其他流行的测试框架一样,Nose也支持并行测试。nose.plugins和多进程插件可用于在可配置数量的工作进程中并行化测试运行。
虽然执行中的并行化加快了CPU密集型测试运行,但它有利于IO密集型测试,因为大部分时间都花在等待数据的到达上。Nose上的官方文档有与并行测试相关的深入信息。
在这个特定的Python Nose教程中,将专注于在基于云的Selenium网格上进行并行测试。对于与用于跨浏览器测试的selenium网格相关的用例,nosetests中的命令行选项(-processes)可用于将测试执行分布在多个内核上。
在使用Nose进行Selenium测试自动化时,以下命令对于实现并行化很有用:
Shell
1 nosetests --process-timeout=<optional-process-timeout> --processes=<num-processes> file-name.py
这是可用于并行化使用Nose框架的测试的–processes=NUM选项的详细说明。

虽然在本地Selenium网格上使用并行测试可以获得显著的好处,但如果在基于云的Selenium网格上使用,它会成倍增加。因此,决定在这个Python Nose教程的基于云的Selenium网格上演示Nose中的并行测试。
流行网站StackOverflow上的用户一直在寻求利用Nose中的并行测试,Python Nose教程的这一部分将帮助开始在Nose中进行并行测试。
以下是必须在LambdaTest的Selenium网格上并行执行的三个测试。
1.测试用例–1(浏览器–Chrome,版本–71.0,平台–Windows10)
(1)导航到URL https://lambdatest.github.io/sample-todo-app/
(2)选中前两个复选框
(3)将“在LambdaTest进行快乐测试”发送到id=sampletodotext的文本框
(4)单击添加按钮并验证是否已添加文本
2.测试用例–2(浏览器–Firefox,版本–64.0,平台–Windows10)
(1)导航到URLhttps://www.lambdatest.com/blog/
(2)预期的标题是LambdaTest跨浏览器测试博客
(3)断言打开的窗口的标题是否与预期的标题不匹配
3.测试用例–3(浏览器–Safari,版本–12.0,平台–macOS Mojave)
(1)导航到URLhttps://www.google.com
(2)搜索“Lambdatest”
(3)找到第一个搜索结果并单击相同
(4)断言打开的窗口的标题是否与预期的标题不匹配
首先,使用LambdaTest功能生成器生成所需的浏览器和平台功能。例如,下面显示的是测试用例1所需的功能。
Python
1 ch_caps = {
2 "build" : "Nose Testing using Chrome on Windows Environment",
3"name" : "Nose Testing on Chrome using Selenium Grid Environment",
4 "platform" : "Windows 10",
5 "browserName" : "Chrome",
6"version" : "71.0",
7"selenium_version" : "3.13.0",
8 "chrome.driver" : 2.42
9}
其余两个浏览器和操作系统组合重复相同的顺序。创建了三个单独的测试用例,并为测试场景使用了相应的浏览器功能。
执行
Python
1 # test_math.py
2 import nose
3 from nose.tools import <some p
4 from nose.tools import assert_equal
5 from parameterized import parameterized, parameterized_class
6import unittest
7 import math
8 from nose.tools import with_setup
9 from selenium import webdriver
10 import time
11 from time import sleep
12 import urllib3
13 import warnings
14
15 user_name = "user-name"
16 app_key = "pass-key"
17
18 # @parameterized([
19 # ("Chrome", "83.0", "Windows 10"),
20 # ("MicrosoftEdge", "81.0", "macOS High Sierra"),
21 # ("Safari", "12.0", "macOS Mojave"),
22 # ("Firefox", "76.0", "Windows 7"),
23 #])
24
25 #Set capabilities for testing on Chrome
26 ch_caps = {
27 "build" : "Nose Testing using Chrome on Windows Environment",
28 "name" : "Nose Testing on Chrome using Selenium Grid Environment",
29 "platform" : "Windows 10",
30 "browserName" : "Chrome",
31 "version" : "71.0",
32 "selenium_version" : "3.13.0",
33 "chrome.driver" : 2.42
34 }
35
36 #Set capabilities for testing on Firefox
37 ff_caps = {
38 "build" : "Nose Testing using Firefox on Windows Environment",
39 "name" : "Nose Testing on Firefox using Selenium Grid Environment",
40 "platform" : "Windows 10",
41 "browserName" : "Firefox",
42 "version" : "64.0",
43 }
44
45 #Set capabilities for testing on Safari
46 saf_caps = {
47 "build" : "Nose Testing using Safari on macOS Mojave Environment",
48 "name" : "Nose Testing on Safari using Selenium Grid Environment",
49 "platform" : "macOS Mojave",
50 "browserName" : "Safari",
51 "version" : "12.0",
52 }
53
54 # _multiprocess_can_split_ = True
55
56 def teardown_func():
57 global driver
58 print("Inside TearDown")
59 driver.quit()
60
61 @with_setup(None, teardown_func)
62 def test_verify_todo_app():
63 global driver
64urllib3.disable_warnings(urllib3.exceptions.InsecureRequestWarning)
65 # Details can be sourced from https://automation.lambdatest.com/
66 remote_url = "https://" + user_name + ":" + app_key + "@hub.lambdatest.com/wd/hub"
67
68 driver = webdriver.Remote(command_executor = remote_url, desired_capabilities = ch_caps)
69 driver.get('https://lambdatest.github.io/sample-todo-app/')
70 driver.maximize_window()
71
72 driver.find_element_by_name("li1").click()
73 driver.find_element_by_name("li2").click()
74
75 title = "Sample page - lambdatest.com"
76 assert title == driver.title
77
78 sample_text = "Happy Testing at LambdaTest"
79 email_text_field =driver.find_element_by_id("sampletodotext")
80 email_text_field.send_keys(sample_text)
81 time.sleep(5)
82
83 driver.find_element_by_id("addbutton").click()
84 time.sleep(5)
85
86 assert driver.find_element_by_xpath("//span[.='Happy Testing at LambdaTest']").text == sample_text
87
88 @with_setup(None, teardown_func)
89 def test_lt_blog():
90 global driver
91urllib3.disable_warnings(urllib3.exceptions.InsecureRequestWarning)
92 # Details can be sourced from https://automation.lambdatest.com/
93 remote_url = "https://" + user_name + ":" + app_key + "@hub.lambdatest.com/wd/hub"
94
95 driver = webdriver.Remote(command_executor = remote_url, desired_capabilities = ff_caps)
96driver.get('https://www.lambdatest.com/blog/')
97 driver.maximize_window()
98
99 expected_title = "LambdaTest | A Cross Browser Testing Blog"
100 assert expected_title == driver.title
101 time.sleep(5)
102
103 @with_setup(None, teardown_func)
104 def test_verify_google():
105 global driver
106urllib3.disable_warnings(urllib3.exceptions.InsecureRequestWarning)
107 # Details can be sourced from https://automation.lambdatest.com/
108 remote_url = "https://" + user_name + ":" + app_key + "@hub.lambdatest.com/wd/hub"
109
110 driver = webdriver.Remote(command_executor = remote_url, desired_capabilities = saf_caps)
111 driver.get('https://www.google.com/')
112 driver.maximize_window()
113 title = "Google"
114 assert title == driver.title
115
116 search_text = "LambdaTest"
117 search_box = driver.find_element_by_xpath("//input[@name='q']")
118 search_box.send_keys(search_text)
119
120 time.sleep(5)
121 search_box.submit()
122
123 time.sleep(5)
124
125 # Click on the LambdaTest HomePage Link
126 # This test will fail as the titles will not match
127 title = "Most Powerful Cross Browser Testing Tool Online | LambdaTest"
128 lt_link = driver.find_element_by_xpath("//h3[.='LambdaTest: Most Powerful Cross Browser Testing Tool Online']")
129 lt_link.click()
130
131 time.sleep(10)
132 assert title == driver.title
133 time.sleep(2)
代码演练
由于在各个测试用例中使用了所需的浏览器功能,因此不需要设置功能。teardown函数终止WebDriver实例。
Python
1 # _multiprocess_can_split_ = True
2 def teardown_func():
3global driver
4print("Inside TearDown")
5 driver.quit()
@with_setupdecorators用于将拆解(teardown_func)方法添加到相应的测试函数中。
Python
1 @with_setup(None, teardown_func)
2 def test_verify_todo_app():
3 ............
4............
5 ............
6 @with_setup(None, teardown_func)
7 def test_lt_blog():
8 ............
9............
10 ............
11 @with_setup(None, teardown_func)
12 def test_verify_google():
13 ............
14............
15 ............
核心实现不需要更改,因为更改仅与基础设施相关。
执行
以下命令用于在基于云的Selenium Grid上并行执行三个测试用例
Shell
1nosetests --process-timeout=60 --processes=3 Nose_Parallel_Test.py
左右滑动查看完整代码
选择3的原因是当前的计费计划允许并行执行5个测试。因此,所有三个测试用例都在平台上同时执行。

这是执行的屏幕截图,表明三个测试在基于云的Selenium网格上并行运行:

测试在Selenium网格上成功执行:

六、结语
在这个Python Nose教程系列中,简要介绍了用于Selenium Python测试的测试框架Nose(版本1.3.7)。该框架是对unittest的扩展,使测试更容易。选择Nose而不是unittest的主要优点是,它消除了样板代码的要求。
它还拥有大量插件,增加了对decorators、Fixtures、参数化测试等的支持。这些特性增强了框架的可用性。
希望本文能帮助人们理解并使用Nose执行selenium python测试。
原文链接:https://dzone.com/articles/getting-started-with-nose-in-python-tutorial
以上就是如何开始使用Python中的Nose的详细内容,更多请关注其它相关文章!
