Springboot+Mybatis-plus不使用SQL语句进行多表添加怎么实现
在Springboot+Mybatis-plus不使用SQL语句进行多表添加操作
我所遇到的问题准备工作在测试环境下模拟思维分解一下:创建出一个带有参数的BrandDTO对象模拟对后台传递参数
我所遇到的问题
我们都知道,在我们使用Mybatis-plus中进行多表操作是极其困难的,如果你不使用Mybatis-plus-join这一类的工具,你只能去配置对应的Mapper.xml文件,配置又臭又长的ResultMap,然后再去写对应的sql语句,这种方法虽然看上去很麻烦,但具有很高的灵活性,可以让我们更灵活的修改甲方需要的功能.
但是如果我将要做一个很普通的小项目,不需要什么灵活的变动,并且我不想去写SQL语句,想直接用Mybatis-plus的功能来实现多表(一主多副)数据的添加,那我该怎么做呢?
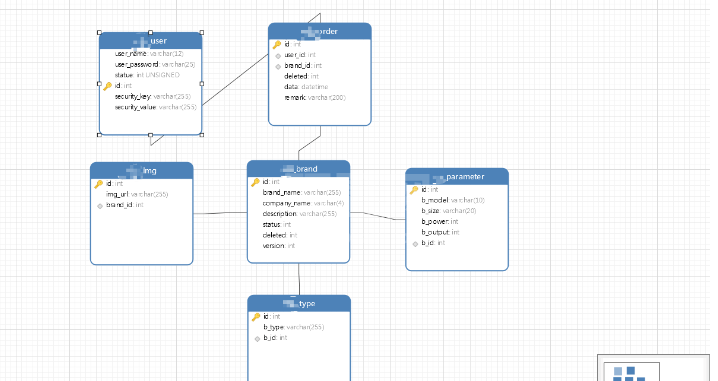
观看数据库可以知道,我们有商品表,然而商品对于商品图片,商品参数和商品类型都是一对多或者多对一的关系,但是我想要我们的前端可以直接提交一个表单就能完成多个表中数据的添加,多表操作是必然的了

准备工作
因为此操作之前我已经使用了mybatis-plus-join的多表查询操作,所以我已经生成了一个DTO的实体类
@Data
public class BrandDTO {

    private Integer id;
    //类型表
    private String type;

    //商品表
    private String brandName;
    private String companyName;
    private String description;
    //图片链接表
    private List<Img> imgUrlList;
    //参数表
    private List<Parameter> parameterList;

}
在这个类中你会疑惑 : 为什么我不直接封装一个Brand实体对象进来呢?
因为我之前使用了这个类来进行连表查询,把各个实体类的参数分开放进来(竟然没有重名的 hhhh),并且这个类需要做展示,所以我把Brand类的属性原原本本加入进来,而tpye对应Brand应该是多(type)对一(Brand),所以在这里我也只封装了一个,但由于Brand对于Img和Parameter是一对多的关系,所以我把他们封装成为了一个list<对象>,就这样我们得到了一个类似于中间类的东西
在测试环境下模拟
我们不妨想一下,有了这样的一个类,我们只需要把参数分开添加到各个表中,我们需要想象我们得到一个封装有数据的BrandDTO的对象,然后拆解开来使用各自的mapper接口的方法来进行插入表格行为
(首先接口要继承对应的BaseMapper<>,才可以进行快速操作,当然如果你在接口有对应的添加方法也可以,但是既然我们用了mybatis-plus,为什么还要拐回去自己写添加方法?)
于是,经过几次反复实验,我得到了如下测试方法:
 @Test
    public void addBrand(){
        Brand brand = new Brand();
        Type type = new Type();
        Img img = new Img();
        Parameter parameter = new Parameter();

        BrandDTO brandDTO = new BrandDTO();
        brandDTO.setBrandName("测试商品3");
        brandDTO.setCompanyName("厂家3");
        brandDTO.setDescription("这是第二个个测试");

        brandDTO.setType("第Ⅱ型");

        List<Img> imgs =new ArrayList<>();
        imgs.add(new Img("w/daw/daw/daww"));
        imgs.add(new Img("xxwdAWd/dawd/wx"));
        brandDTO.setImgUrlList(imgs);


        List<Parameter> parameters = new ArrayList<>();
        parameters.add(new Parameter("110","270*860*270",30,450));
        parameters.add(new Parameter("120","170*4350*720",990,5530));
        brandDTO.setParameterList(parameters);


        List<Img> imgUrlList = brandDTO.getImgUrlList();
        List<Parameter> parameterList = brandDTO.getParameterList();


        brand.setBrandName(brandDTO.getBrandName());
        brand.setCompanyName(brandDTO.getCompanyName());
        brand.setDescription(brandDTO.getDescription());
        brandMapper.insert(brand);

        Integer id = brand.getId();

        type.setBType(brandDTO.getType());
        type.setBId(id);
        typeMapper.insert(type);

        for (Parameter parameterl : parameterList) {
            parameter.setBModel(parameterl.getBModel());
            parameter.setBOutput(parameterl.getBOutput());
            parameter.setBSize(parameterl.getBSize());
            parameter.setBId(id);
            parameterMapper.insert(parameter);
        }

        for (Img imgl : imgUrlList) {
            img.setImgUrl(imgl.getImgUrl());
            img.setBrandId(id);
            imgMapper.insert(img);
        }

        System.out.println(id);

    }
思维分解一下:
接下来我会对方法体的各个部分进行分解表达
创建出一个带有参数的BrandDTO对象
首先我们模拟了一个封装有各个参数的BrandDTO对象:
        Type type = new Type();
        Img img = new Img();
        Parameter parameter = new Parameter();

        BrandDTO brandDTO = new BrandDTO();
        brandDTO.setBrandName("测试商品3");
        brandDTO.setCompanyName("厂家3");
        brandDTO.setDescription("这是第二个个测试");

        brandDTO.setType("第Ⅱ型");

        List<Img> imgs =new ArrayList<>();
        //此操作能成功是因为我在对应的对象中生成了除了id属性和外键属性的有参构造
        imgs.add(new Img("w/daw/daw/daww"));
        imgs.add(new Img("xxwdAWd/dawd/wx"));
        brandDTO.setImgUrlList(imgs);


        List<Parameter> parameters = new ArrayList<>();
        //此操作能成功是因为我在对应的对象中生成了除了id属性和外键属性的有参构造
        parameters.add(new Parameter("110","270*860*270",30,450));
        parameters.add(new Parameter("120","170*4350*720",990,5530));
        brandDTO.setParameterList(parameters);
这一部分主要是对参数的封装,是前端的工作,让我们后台服务器收到一个带有参数的BrandDTO对象
模拟对后台传递参数
取出各个表中所对应的各个参数
		//取出ImgUrlList和ParameterList()
		List<Img> imgUrlList = brandDTO.getImgUrlList();
        List<Parameter> parameterList = brandDTO.getParameterList();

		//单独封装brand对象
        brand.setBrandName(brandDTO.getBrandName());
        brand.setCompanyName(brandDTO.getCompanyName());
        brand.setDescription(brandDTO.getDescription());
        //调用对应Mapper接口的insert方法(或者你自己写的添加方法)
        brandMapper.insert(brand);
        //使用主键返回(要确保mybatis中设置了主键自增并且在各个实体类中声明了主键属性)
        Integer id = brand.getId();
经过以上以上操作我们向Brand表中添加了一行信息,并且将主键返回了过来.
于是我们的其他表知晓了对应的商品的id,就可以利用此id来进行表中外键id的定义:
(请注意,在这个测试类中我把所需要用的各个实体类的Mapper接口都注入了,所以我才能调用insert方法)
		//向Type表中添加数据并指定外键(BrandID)的id
		type.setBType(brandDTO.getType());
        type.setBId(id);
        typeMapper.insert(type);
        //向Paramater表中添加数据并指定外键(BrandID)的id
        for (Parameter parameterl : parameterList) {
            parameter.setBModel(parameterl.getBModel());
            parameter.setBOutput(parameterl.getBOutput());
            parameter.setBSize(parameterl.getBSize());
            parameter.setBId(id);
            parameterMapper.insert(parameter);
        }
        //向Img表中添加数据并指定外键(BrandID)的id
        for (Img imgl : imgUrlList) {
            img.setImgUrl(imgl.getImgUrl());
            img.setBrandId(id);
            imgMapper.insert(img);
        }
采用循环添加,我们可以将对象中的数据逐个添加到各个表中,接下来我们需要通过控制台来得到我们添加商品对应的主键id:
System.out.println(id);
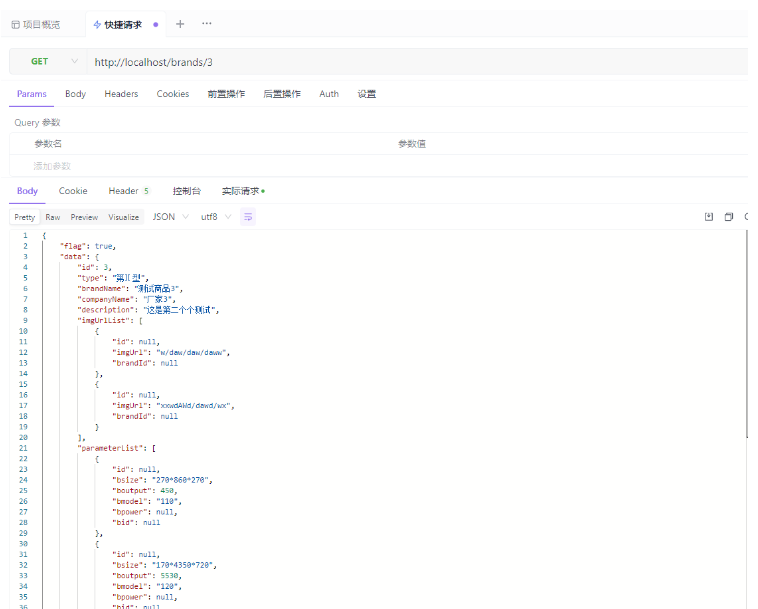
在这之后我们运行,我这里得到的数据是3,然后我们去调用通过id查询商品的方法:
我这里用的是Apifox:

可以看出来我们的信息已经插入了表格.返回值部分为null是因为我写的多表查询有一些小bug,但是在数据库仍然是有数据的,由此可见,这个测试是成功了,接下来只要将代码CV到对应的service,在controller层模拟传入一个Json对象就可以检验是否可行!
以上就是Springboot+Mybatis-plus不使用SQL语句进行多表添加怎么实现的详细内容,更多请关注其它相关文章!
