Angular如何进行视图封装?聊聊三种封装模式
Angular如何进行视图封装?下面本篇文章给大家深入了解一下Angular Encapsulation的三种方式,希望对大家有所帮助!

在日常工作中,当我们定义一个Component的时候,要考虑它的encapsulation封装性,也就是说你期望这个组件里定义的样式是只作用于这个组件,还是想作用于全局。在 Angular 中,组件的样式可以封装在组件的宿主元素中,这样它们就不会影响应用程序的其余部分。Component 的装饰器提供了 encapsulation 选项,可用来控制如何基于每个组件应用视图封装。【相关教程推荐:《angular教程》】
ViewEncapsulation
Angular中有三种封装模式,分别是ViewEncapsulation.ShadowDom,ViewEncapsulation.Emulated,ViewEncapsulation.None。
export enum ViewEncapsulation {
    /**
     * Emulates a native Shadow DOM encapsulation behavior by adding a specific attribute to the
     * component's host element and applying the same attribute to all the CSS selectors provided
     * via {@link Component#styles styles} or {@link Component#styleUrls styleUrls}.
     *
     * This is the default option.
     */
    Emulated = 0,
    /**
     * Doesn't provide any sort of CSS style encapsulation, meaning that all the styles provided
     * via {@link Component#styles styles} or {@link Component#styleUrls styleUrls} are applicable
     * to any HTML element of the application regardless of their host Component.
     */
    None = 2,
    /**
     * Uses the browser's native Shadow DOM API to encapsulate CSS styles, meaning that it creates
     * a ShadowRoot for the component's host element which is then used to encapsulate
     * all the Component's styling.
     */
    ShadowDom = 3
}- ViewEncapsulation.Emulated:使用垫片(shimmed) CSS 来模拟原生行为。
- ViewEncapsulation.None :使用不带任何封装的全局 CSS。
- ViewEncapsulation.ShadowDom:使用 Shadow DOM v1,封装样式。
如果没有提供,该值就会从 CompilerOptions 中获取它。默认的编译器选项是 ViewEncapsulation.Emulated。
如果该策略设置为 ViewEncapsulation.Emulated,并且该组件没有指定 styles 或 styleUrls,就会自动切换到 ViewEncapsulation.None。
有没有发现枚举类型了为什么没有1?这个待会再说。
ViewEncapsulation.ShadowDom
抛开Angular中的ShadowDom的封装,先来看一下什么是ShadowDOM吧。
Shadow DOM
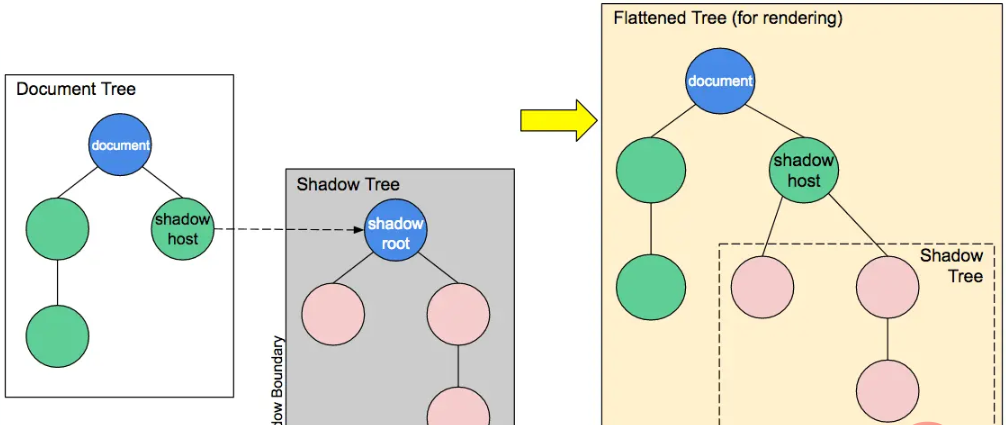
Shadow DOM 允许将隐藏的 DOM 树附加到常规的 DOM 树中——它以 shadow root 节点为起始根节点,在这个根节点的下方,可以是任意元素,和普通的 DOM 元素一样。

这里,有一些 Shadow DOM 特有的术语需要我们了解:
- Shadow host:一个常规 DOM 节点,Shadow DOM 会被附加到这个节点上。
- Shadow tree:Shadow DOM 内部的 DOM 树。
- Shadow boundary:Shadow DOM 结束的地方,也是常规 DOM 开始的地方。
- Shadow root: Shadow tree 的根节点。
你可以使用同样的方式来操作 Shadow DOM,就和操作常规 DOM 一样——例如添加子节点、设置属性,以及为节点添加自己的样式(例如通过 element.style 属性),或者为整个 Shadow DOM 添加样式(例如在 元素内添加样式)。不同的是,Shadow DOM 内部的元素始终不会影响到它外部的元素(除了 :focus-within),这为封装提供了便利。
我们来看一个简单的例子吧。
<!DOCTYPE html>
<html>
<head>
<meta charset="UTF-8">
<meta http-equiv="X-UA-Compatible" content="IE=edge">
<meta name="viewport" content="width=device-width, initial-scale=1.0">
<title>Shadow DOM</title>
<style>
span{
color: green;
}
</style>
</head>
<body>
<span>我是Root</span>
<div id="app"></div>
<script>
let app = document.querySelector('#app');
let shadow1 = app.attachShadow({ mode: 'open'});
let style1 = document.createElement('style');
style1.appendChild(document.createTextNode("span{color: red;}"));
shadow1.appendChild(style1);
let span1 = document.createElement('span');
span1.textContent = 'I am span.';
shadow1.appendChild(span1);
</script>
</body>
</html>
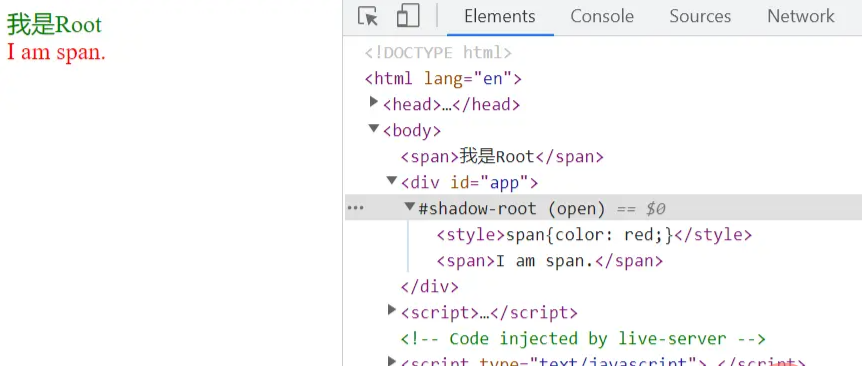
上面的例子,定义了全局span的样式,也定义了shadowDOM里的span样式,可以看出相互不受影响。
Angular中ShadowDOM的封装
了解了什么是ShadowDOM后,再来看一下Angular中ShadowDOM的封装。
Angular 使用浏览器内置的 Shadow DOM API 将组件的视图包含在 ShadowRoot(用作组件的宿主元素)中,并以隔离的方式应用所提供的样式。ViewEncapsulation.ShadowDom 仅适用于内置支持 shadow DOM 的浏览器。并非所有浏览器都支持它,这就是为什么 ViewEncapsulation.Emulated 是推荐和默认模式的原因。
比如下面的这个例子,使用ViewEncapsulation.ShadowDom。
@Component({
  selector: 'user-child',
  templateUrl: 'UserChild.component.html',
  styles: [`
  h3{
    color: red;
  }
  `],
  encapsulation: ViewEncapsulation.ShadowDom
})

export class UserChildComponent implements OnInit {
  ......
}
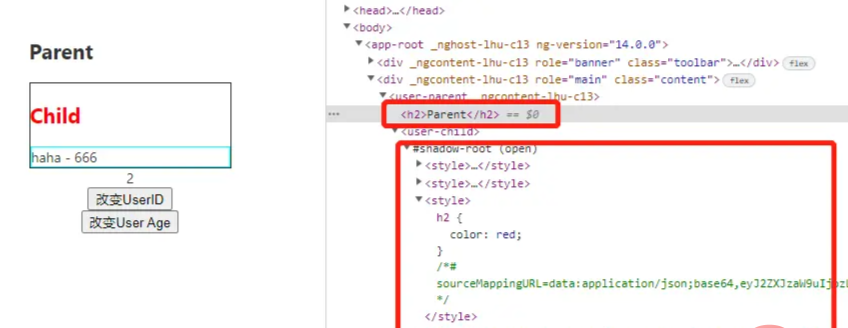
从运行的页面上看到,user-child组件内部被封装成了一个ShadowDOM,style也被封装在了里面,并不会对外部的样式造成影响。
ViewEncapsulation.Emulated
Angular 会修改组件的 CSS 选择器,使它们只应用于组件的视图,不影响应用程序中的其他元素(模拟 Shadow DOM 行为)。
使用模拟视图封装时,Angular 会预处理所有组件的样式,以便它们仅应用于组件的视图。在正运行的 Angular 应用程序的 DOM 中,使用模拟视图封装模式的组件所在的元素附加了一些额外的属性:
<hero-details _nghost-pmm-5>
  <h3 _ngcontent-pmm-5>Mister Fantastic</h3>
  <hero-team _ngcontent-pmm-5 _nghost-pmm-6>
    <h4 _ngcontent-pmm-6>Team</h4>
  </hero-team>
</hero-details>
有两种这样的属性:
| 属性 | 详情 |
|---|---|
| _nghost | 被添加到包裹组件视图的元素中,这将是本机 Shadow DOM 封装中的 ShadowRoots。组件的宿主元素通常就是这种情况。 |
| _ngcontent | 被添加到组件视图中的子元素上,这些属性用于将元素与其各自模拟的 ShadowRoots(具有匹配 _nghost 属性的宿主元素)相匹配。 |
这些属性的确切值是 Angular 的私有实现细节。它们是自动生成的,你不应在应用程序代码中引用它们。
它们以生成的组件样式为目标,这些样式会被注入到 DOM 的 部分:
[_nghost-pmm-5] {
  display: block;
  border: 1px solid black;
}

h4[_ngcontent-pmm-6] {
  background-color: white;
  border: 1px solid #777;
}
这些样式经过后期处理,以便每个 CSS 选择器都使用适当的 _nghost 或 _ngcontent 属性进行扩充。这些修改后的选择器可以确保样式以隔离和有针对性的方式应用于组件的视图。
<p>child works!</p>
p{
  color: green;
}
@Component({
selector: 'app-child',
templateUrl: './child.component.html',
styleUrls: ['./child.component.scss'],
encapsulation: ViewEncapsulation.Emulated
})
export class ChildComponent implements OnInit {
......
}
ViewEncapsulation.Emulated 设置的结果是没有 Shadow DOM,但是通过 Angular 提供的样式包装机制来封装组件,使得组件的样式不受外部影响。虽然样式仍然是应用到整个 document,但 Angular 为 p创建了一个 [_ngcontent-oow-c11] 选择器。可以看出,我们为组件定义的样式,被 Angular 修改了。简单来说,尽管是也是全局样式,但是由于自动选择器的原因,并不会影响其他组件的样式。如果手动在其他元素上也添加这个属性,则样式也会应用到这元素上。
ViewEncapsulation.None
Angular 不应用任何形式的视图封装,这意味着为组件指定的任何样式实际上都是全局应用的,并且可以影响应用程序中存在的任何 HTML 元素。这种模式本质上与将样式包含在 HTML 本身中是一样的。
parent:
<p #caption>parent works!{{count}}</p>
<p #caption>第一个:{{count}}</p>
<span class="red-font">parent</span>
<app-child></app-child>
child:
<div style="border: 1px solid green;">
    <p>child works!</p>
    <span class="red-font">Child</span>
</div>
p{
color: green;
}
.red-font {
color: red;
}@Component({
selector: 'app-child',
templateUrl: './child.component.html',
styleUrls: ['./child.component.scss'],
encapsulation: ViewEncapsulation.None
})
export class ChildComponent implements OnInit {
......
}
被废弃的Native
在Angular2中使用ViewEncapsulation.Native。
@Component({
  ...,
  encapsulation: ViewEncapsulation.Native
})
export class UserComponent {
ViewEncapsulation.Native 设置的结果是使用原生的 Shadow DOM 特性。Angular 会把组件按照浏览器支持的 Shadow DOM 形式渲染。其实这种就是后来的ViewEncapsulation.ShadowDom。
总结
我们介绍了Angular视图封装的三种方式,各自的特点,日常工作中要根据特定的场景去选择哪种封装方式。
更多编程相关知识,请访问:编程视频!!
以上就是Angular如何进行视图封装?聊聊三种封装模式的详细内容,更多请关注其它相关文章!
